Embroidery is more than just thread on fabric. It is art. It tells a story. But sometimes, flat designs do not grab attention. This is where a 3D look can help. It makes your design pop. It adds depth. It gives a bold and rich feel.If you want your designs to stand out, you need to learn the right steps. Many beginners make small mistakes. These can ruin the final look. To avoid that, you can follow simple guides like Best Practices For 3D Puff Embroidery and build a strong base for your work.
What Is 3D Embroidery?
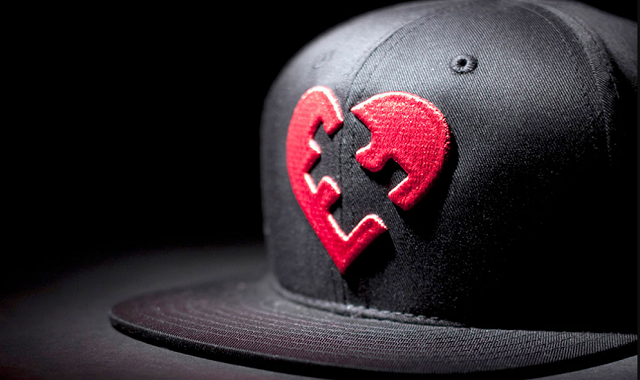
3D embroidery is also called puff embroidery. It uses foam under the stitches. This foam lifts the thread. It creates a raised look.
This style is popular on:
- Caps
- Jackets
- Hoodies
- Logos
It gives a bold and premium finish. That is why many brands use it.
Why Choose a 3D Look?
A 3D design is eye-catching. It stands out from flat embroidery.
Key Benefits
Strong Visual Impact
The raised look makes the design easy to see.
Premium Feel
It gives a high-end look. It feels rich and clean.
Better Branding
Logos look bold. They stay in the mind of the viewer.
My First Experience with 3D Embroidery
When I first tried puff embroidery, I made mistakes. My design looked uneven. The foam showed through. The thread broke often.
But with practice, I learned key steps. I tested many fabrics. I changed settings. Over time, my results improved.
Now, I always follow a clear process. This helps me get clean and strong designs.
Tools You Need for 3D Embroidery
Good tools make a big difference. You cannot get great results with poor tools.
Foam
Foam is the base of 3D embroidery. It sits under the stitches.
Tips for Foam
- Use good quality foam
- Pick the right thickness
- Match foam color with thread
Needles
The right needle helps avoid thread breaks.
Tips for Needles
- Use sharp needles
- Change needles often
- Pick the correct size
Thread
Thread quality affects the final look.
Tips for Thread
- Use strong thread
- Avoid cheap thread
- Match color well
Stabilizer
This keeps the fabric in place.
Tips for Stabilizer
- Use strong backing
- Choose based on fabric type
Choosing the Right Design
Not all designs work well for 3D embroidery.
Simple Shapes Work Best
Bold and simple shapes give better results.
Good Choices
- Block letters
- Thick logos
- Simple icons
Avoid
- Thin lines
- Small text
- Fine details
Digitizing for a 3D Effect
Digitizing is very important. A bad file can ruin your work.
Key Points to Focus On
Stitch Density
Keep density balanced. Too tight can break thread.
Underlay
Use proper underlay. It supports the foam.
Stitch Direction
Plan stitch direction well. It helps cover the foam.
Step-by-Step Process for 3D Embroidery
Let’s go through the basic steps.
Step 1: Prepare the Fabric
Make sure the fabric is clean and tight.
Tips
- Hoop the fabric well
- Avoid loose areas
Step 2: Place the Foam
Put foam over the design area.
Tips
- Cut foam slightly bigger than design
- Keep it flat
Step 3: Start Stitching
The machine will stitch over the foam.
Tips
- Watch the first few stitches
- Check for thread breaks
Step 4: Remove Extra Foam
After stitching, remove extra foam.
Tips
- Tear gently
- Use a brush if needed
Common Mistakes to Avoid
Even small mistakes can affect your design.
Using Wrong Foam
Too thick foam can cause issues. Too thin foam may not give a good lift.
Poor Digitizing
Bad stitch paths can expose foam.
Wrong Thread Tension
Loose tension can create loops. Tight tension can break thread.
Skipping Test Runs
Always test before final work. This saves time and cost.
Tips to Make Your Design Pop
Small changes can improve your work a lot.
Use Bold Colors
Bright colors look better in 3D designs.
Add Contrast
Use different colors for more depth.
Keep Edges Clean
Sharp edges make the design look neat.
Choose the Right Fabric
Thick fabric works better for puff embroidery.
Advanced Techniques for Better Results
Once you learn the basics, try advanced ideas.
Layering
Use both flat and 3D stitches in one design.
Benefit
It adds more depth and detail.
Mixing Stitch Types
Combine satin stitch with fill stitch.
Benefit
It creates texture and contrast.
Gradient Effects
Use different shades of the same color.
Benefit
It gives a smooth and rich look.
How to Fix Common Problems
Problems can happen. But they can be fixed.
Thread Breaks
Fix
- Check needle
- Adjust tension
- Use better thread
Foam Showing
Fix
- Increase stitch density
- Improve digitizing
Uneven Surface
Fix
- Use proper foam
- Check hooping
Care Tips for 3D Embroidery
Proper care keeps your design looking new.
Washing
- Wash gently
- Avoid hot water
Drying
- Air dry when possible
- Avoid high heat
Storage
- Keep in a dry place
- Avoid pressure on design
Building Trust with Quality Work
If you sell embroidery, quality matters.
Be Consistent
Keep your work clean and neat.
Use Good Materials
Do not save money on poor tools.
Test Every Design
Each fabric is different. Always test.
Why Practice Is Important
No one gets perfect results on the first try.
Start Small
Try simple designs first.
Learn from Mistakes
Each mistake teaches you something.
Keep Testing
Practice helps you grow.
Final Thoughts
3D embroidery can take your designs to the next level. It makes them bold and eye-catching. It adds value to your work.
But it needs the right steps. You need good tools, proper setup, and smart digitizing.
Take your time. Learn each step. Test your work. With practice, you will see great results.
Keep creating. Keep improving. And enjoy the process of making your embroidery stand out.


